Do not apply this operation in the production environment.
Replication and Rebalancing
Learn how TiKV replicates, distributes, and rebalances data.
This document walks you through a simple demonstration of how TiKV replicates, distributes, and rebalances data. To start a 3-node local cluster, you need to perform the following operations:
- Write some data via go-ycsb, and then verify whether the data is replicated in triplicate by default.
- Add two more nodes and see how TiKV automatically rebalances replicas to efficiently use all available capacity.
Prerequisites
Make sure that you have installed TiUP as described in TiKV in 5 Minutes.
Step 1: Start a 3-node cluster
Check your TiUP version. Execute the following command:
tiup -vDepending on the TiUP version, execute the
tiup-playgroundcommand to start a 3-node local cluster.If TiUP version is v1.5.2 or later, execute the following command:
tiup playground --mode tikv-slim --kv 3If TiUP version is earlier than v1.5.2, execute the following command:
tiup playground --kv 3
After you execute the command, the output is as follows:
Starting component `playground`: /home/pingcap/.tiup/components/playground/v1.5.0/tiup-playground --mode tikv-slim --kv 3
Using the version v5.0.2 for version constraint "".

If you'd like to use a TiDB version other than v5.0.2, cancel and retry with the following arguments:

    Specify version manually:   tiup playground <version>
    Specify version range:      tiup playground ^5
    The nightly version:        tiup playground nightly

Playground Bootstrapping...
Start pd instance
Start tikv instance
Start tikv instance
Start tikv instance
PD client endpoints: [127.0.0.1:2379]
To view the Prometheus: http://127.0.0.1:33703
To view the Grafana: http://127.0.0.1:3000
Step 2: Write data
On another terminal session, you can use go-ycsb to launch a workload.
Clone the
go-ycsbfrom GitHub.git clone https://github.com/pingcap/go-ycsb.gitBuild the application from the source.
makeLoad a small workload using
go-ycsb.# By default, this workload will insert 1000 records into TiKV. ./bin/go-ycsb load tikv -P workloads/workloada -p tikv.pd="127.0.0.1:2379" -p tikv.type="raw"
Step 3: Verify the replication
To understand the replication in TiKV, it is important to review several concepts in the architecture.
| Concept | Description |
|---|---|
| Region | TiKV can be taken as a giant sorted map of key-value pairs. The Region is the basic unit of key-value data movement. Each Region is a range of keys and is replicated to multiple Nodes. These multiple replicas form a Raft group. |
| Peer | TiKV replicates each Region (three times by default) and stores each replica on a different peer. In the same node, it contains multiple peers of different Regions. |
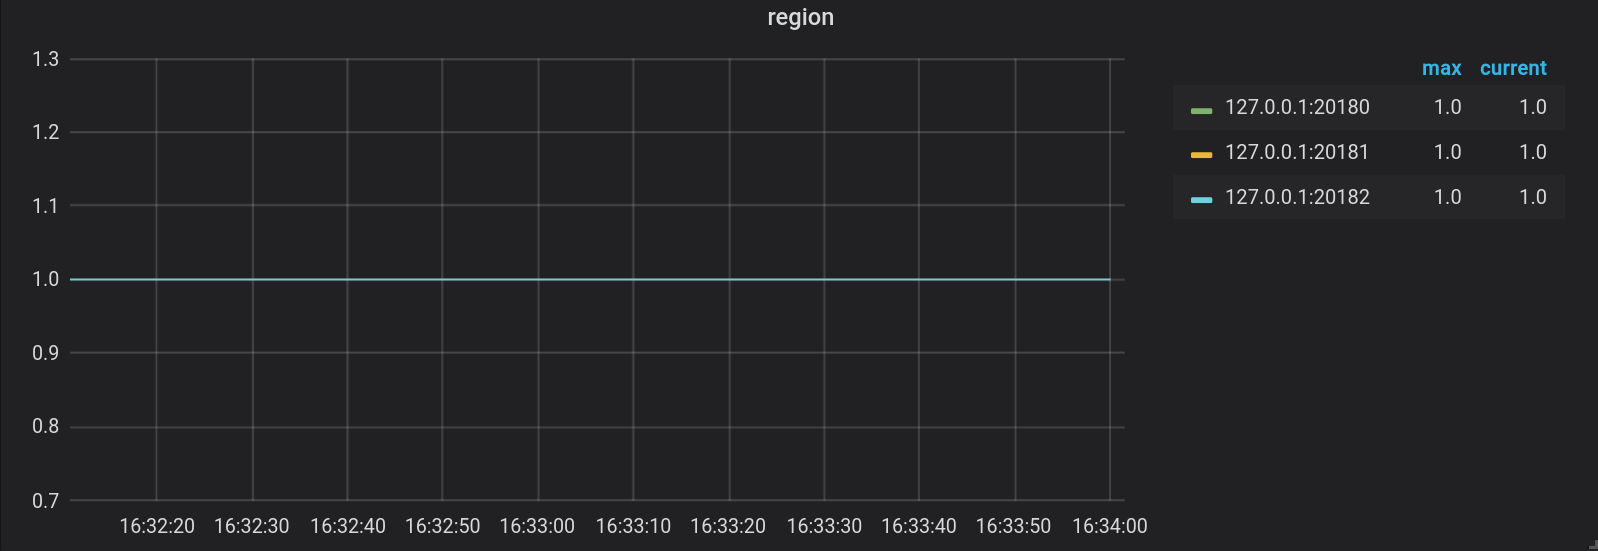
Open the Grafana at http://localhost:3000 (printed from the
tiup-playgroundcommand), and then log in to Grafana using usernameadminand passwordadmin.On the playground-overview dashboard, check the metrics on the Region panel in the TiKV tab. You can see that the numbers of Regions on all three nodes are the same, which indicates the following:
- There is only one Region. It contains the data imported by
go-ycsb. - Each Region has 3 replicas (according to the default configuration).
- For each Region, each replica is stored in different stores.
- There is only one Region. It contains the data imported by
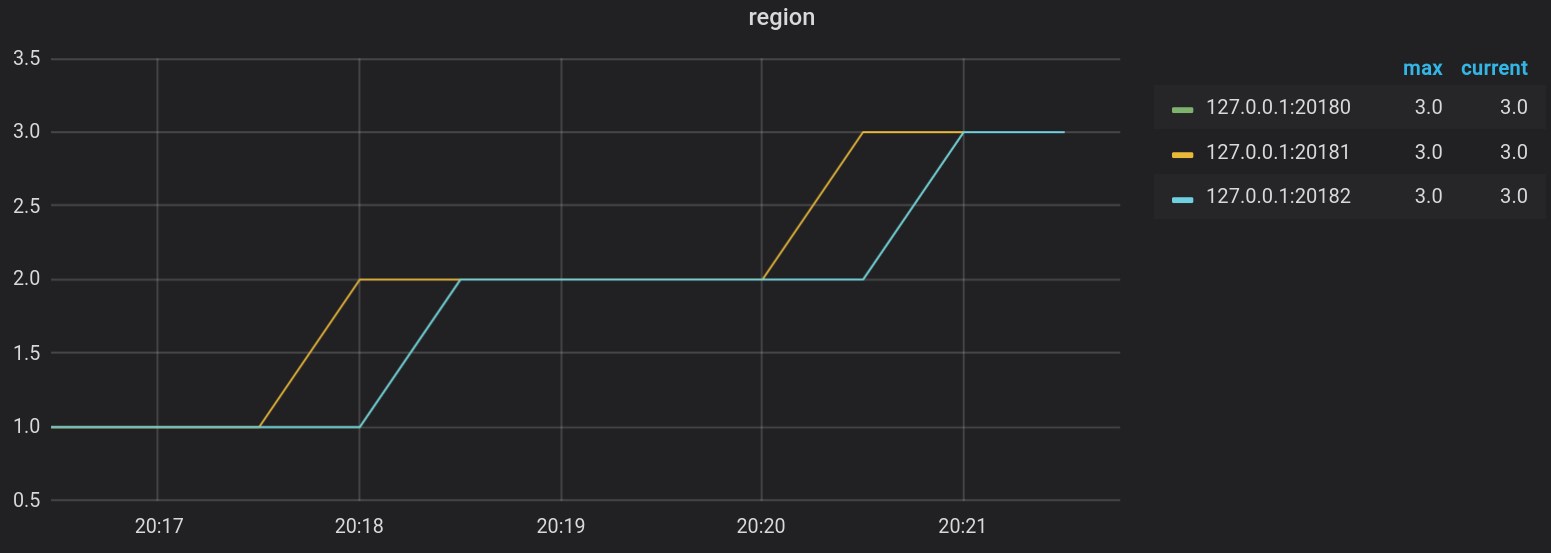
Step 4: Write more data
In this section, you can launch a larger workload, scale the 3-node local cluster to a 5-node cluster, and then check whether the load of the TiKV cluster is rebalanced as expected.
Start a new terminal session and launch a larger workload with
go-ycsb. For example, on a machine with 16 virtual cores, you can launch a workload by executing the following command:./bin/go-ycsb load tikv -P workloads/workloada -p tikv.pd="127.0.0.1:2379" -p tikv.type="raw" -p tikv.conncount=16 -p threadcount=16 -p recordcount=1000000Go to the playground-overview dashboard of the Grafana, and check the Region distribution on the TiKV cluster. The number of Regions keeps increasing while writing data to the cluster as follows:
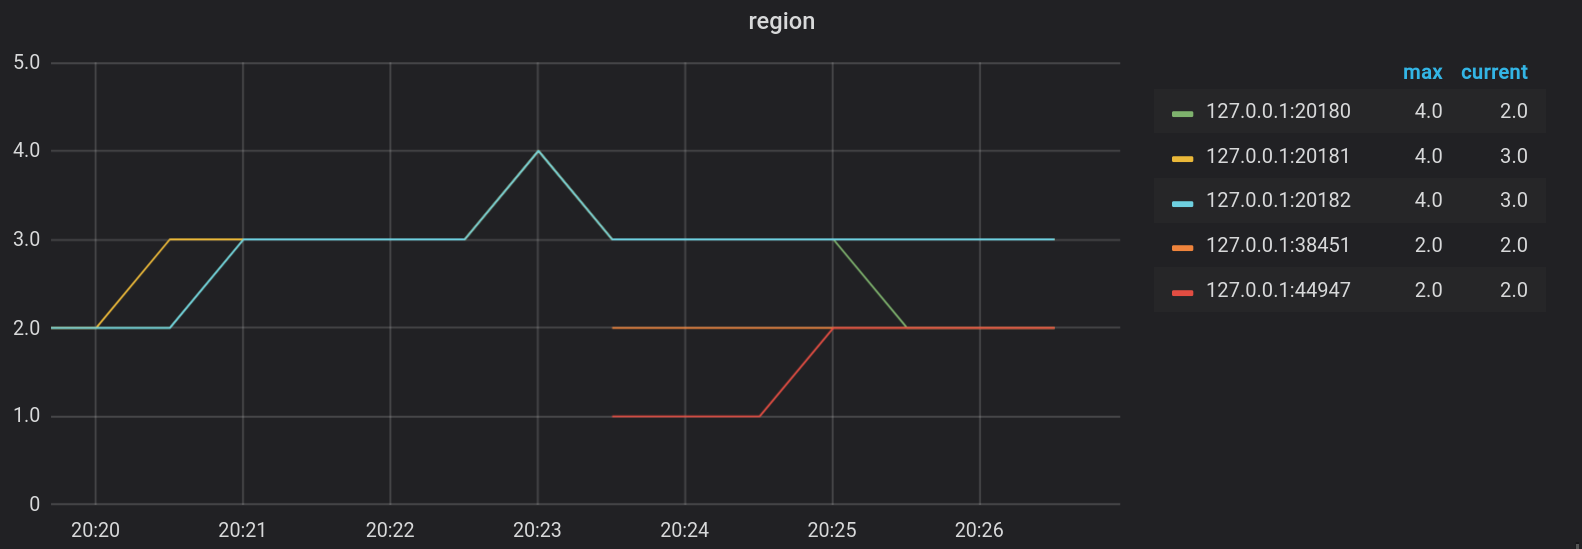
Step 5: Add two more nodes
Start another terminal session and use the
tiup playgroundcommand to scale out the cluster.tiup playground scale-out --kv 2Verify the scale-out cluster by executing the following command:
tiup playground displayThe output is as follows:
Pid     Role  Uptime
---     ----  ------
282731  pd    4h1m23.792495134s
282752  tikv  4h1m23.77761744s
282757  tikv  4h1m23.761628915s
282761  tikv  4h1m23.748199302s
308242  tikv  9m50.551877838s
308243  tikv  9m50.537477856s
Step 6: Verify the data rebalance
Go to the Grafana page as mentioned above. You can find some Regions are split and rebalanced to the two new nodes.
Step 7: Stop and delete the cluster
If you do not need the local TiKV cluster anymore, you can stop and delete it.
To stop the TiKV cluster, get back to the terminal session in which you have started the TiKV cluster. Press Ctrl + C and wait for the cluster to stop.
After the cluster is stopped, to delete the cluster, execute the following command:
tiup clean --all